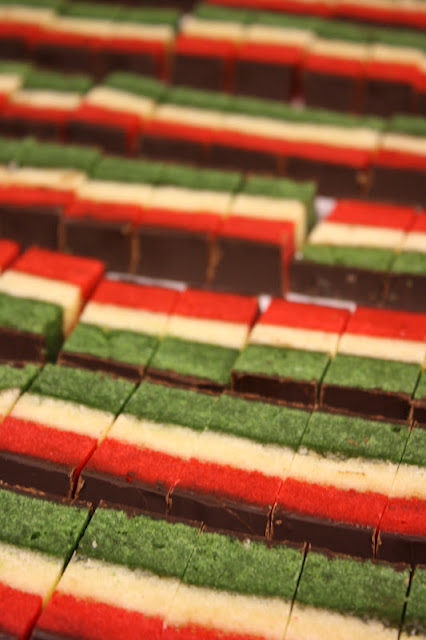
These cookies have a soft cake texture, made with almond paste, filled with apricot jam and coated with dark chocolate. They are not too sweet, easy to eat and simply delicious. Plus they look great. A nice addition to coffee or tea anytime of the day. The steps to make them are simple, once the layers have been 'glued' together with the apricot jam they have to be weighted down overnight, and then they're pretty much done. Try them.
In a mixer with a paddle attachment put:
12oz almond paste
1C sugar and mix till smooth.
Add 2C soft butter and paddle, then add:
6 yolks, paddle on high for 4 minutes until fluffy.
Slowly add 2 3/4C all purpose flour and 1t salt, mix till combined.
In a separate mixer add 6 egg whites, whisk on medium high, when it starts frothing slowly add 1/3C sugar, whisk into a meringue, medium peaks. Fold this into the almond mixture until no streaks remain.
Divide the batter evenly in 3 bowls, color 1 with red food coloring, 1 green food coloring and the other as is. It takes a good amount to get deep colors, brown food coloring was added to the red and the green to get a deeper color.
Spray 3 13x9" sheet pans, line them with parchment paper.
With a large offset spatula even out the batter. Bake about 12 minutes at 350F. Let them cool fully.
Flip the green one first onto a large sturdy cutting board, or a larger sheet tray lined with parchment, spread a thin layer of apricot jam onto that, then flip the white layer, repeat with the jam, lastly flip the red layer. Wrap the whole cake with plastic wrap to not dry out. Cover it with a sheet tray and weigh it down over night with cans, or anything heavy. Place in the fridge.
Next day, melt 8oz of bittersweet chocolate in the microwave and pour half of it over the cool red layer. Place it in the freezer for 10 minutes. Flip the cake over and spread the other half of melted chocolate over the green layer. Place in the freezer for about 30 minutes to cool the whole cake. It will be more sturdy to cut and will stick together.
Now with a large serrated knife cut the trim off of the edges, and then cut 1/4" strips, and cut those strips into 1" cookies, repeat. You can wrap the cookies and freeze them if there are too many, they will stay nice and fresh.
In the photos above we doubled the ingredients giving us thicker layers, up to you. Enjoy.
Sunday, June 24, 2012
Tuesday, June 19, 2012
Cream Puff Tower Cake
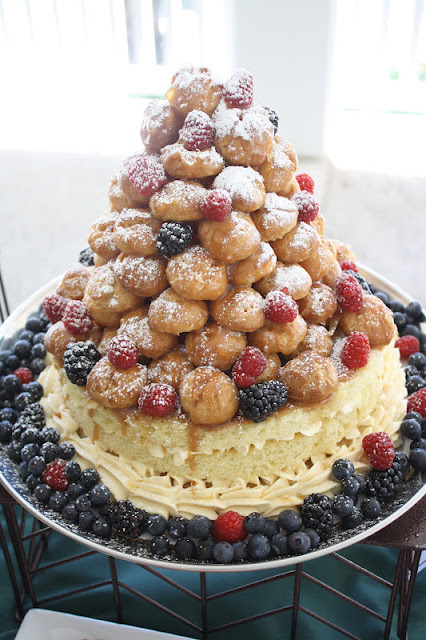
This cake may look complicated, but it's surprisingly easy, and it's definitely a show stopper. The cake is a vanilla chiffon sponge, very light and airy, filled with a light vanilla buttercream, soaked with orange curacao, and topped with caramel sauce. The cream puffs are then 'glued' with caramel, giving the puffs a crunch, more caramel sauce is poured over the tower, it is then decorated with berries and dusted with powdered sugar. This cake is sure to please. The combination of the soft sponge cake eaten with the crunchy cream puffs is really delicious.
First make the chiffon sponge:
In a mixer put:
240g oil
12 yolks
30g vanilla paste
600g sugar
whisk till light in color and fluffy.
Now sift:
24g baking powder
8g salt
600g cake flour and add them on low till combined.
In a separate mixer whisk the whites till they are at medium peaks and add them to the batter in 3 batches, folding them in until you can't see any egg white ribbons.
Grease 2 10" cake pans, line the bottom with parchment circles, and bake for about 45 minutes at 350F.
Test with a skewer, they must be done all the way or the middle will sink.
Cool and cut in half. Soak with orange curacao.
Vanilla buttercream:
In a saucepan put:
3C sugar
1C water and make sure the sugar is covered
1/4C corn syrup to help prevent crystallizing of the sugar
Put on a stove top, let it bubble away until the sugar has reached 240F.
In the mean time in a mixer on high add:
6 whole eggs, whisk till light in color and thicker. When the syrup is at 238F pour it slowly into the eggs as they are mixing on high until all the syrup is in there. Continue mixing on high until the bowl is not hot anymore, then start adding 2.5lbs of soft butter cut in small chunks, add them gradually until each chunk has been mixed in. The whole thing will thicken and will come together. Add vanilla extract at the end, about 3T. Put it in a piping bag and use this as the cake filling, and to decorate around the edges of the cake.
Cream puffs:
In a saucepan put:
335g water
148g butter
23g sugar
5g salt
Bring to a boil then with a wooden spoon stir in:
220g flour
stir vigorously until it is a ball about 1-2 minutes,
put this into a mixing bowl with a paddle attachment, start it on medium high, until it is not steaming anymore, reduce to medium and start adding 6 whole eggs, one at a time until each one has been combined.
Put the batter in to a piping bag, and on a lined sheet tray pipe little 1" balls. 1/2" apart. Chill them, then egg wash them, then bake at 350F for 20 minutes. You can choose to fill them with whipped cream when cool, or leave them plain.
Caramel sauce:
In a saucepan put:
150g corn syrup
400g sugar
1 vanilla bean sliced open
cover with 1/2C water and bring to a boil until it has reached a medium amber color;
pour in slowly 2C heavy cream and let it all dissolve and boil again, then add 1/2 stick of butter at the end, stir well. Cool. Put a layer of this on top of the cake, and build the cream puff tower on top of this.
Caramel:
In a saucepan add:
2C sugar
cover with 1/2C of water, make sure there is no sugar on the edges of the pot and the water is covering it nicely. Boil for about 15-20 minutes until it has reached a light amber color. Take it of the heat, and make sure your hands are covered with 2 layers of rubber gloves. This will be very hot. Take each cream puff, one at a time and dip it into the caramel, then place it on the cake, one at a time, but do it fast creating a tower as the caramel hardens quickly, but this is basically the glue.
To finish it off pour some more caramel sauce over the top of the tower, dust it with powdered sugar, and build berries in between the cream puffs, and the bottom of the cake to complete the look.
Sunday, June 3, 2012
Delicious Red Velvet Cake
It's such a simple cake, yet customers can't seem to get enough of it. Maybe it's the combination of light chocolate with cream cheese.. either way, they sell out every time.
The cake is light and moist, and the icing is not overpowering or too sweet, they go together so perfectly.
This recipe will be enough for 2 10" cakes, and about 20 cupcakes, so if you want less, make half. We just make so much of it, and these can be baked, then frozen, they will still be delicious.
In a mixing bowl put:
2C vegetable oil
4 eggs
3C sugar
2t vanilla extract
2C buttermilk and paddle.
In a small bowl put:
3t baking soda
4t white vinegar. It will bubble, mix and add to the other ingredients that are paddling.
Now add all the dry in another larger bowl:
4T unsweetened extra dark cocoa powder
5C cake flour
2t salt
and put this into the mixing bowl with the other ingredients.
Let it mix lightly on low speed and add:
1C hot water. Mix. Now add red food coloring. About 1/8C, but pour it in slowly, let it mix, you want a deep red color.
Pour it into greased cake pans and cupcake pans. Bake at 350F, about 15-20 minutes for cupcakes, 35-45 minutes for cakes.
Now for the cream cheese icing:
34oz (4 packs) cream cheese
paddle this till it is smooth and not chilled
then add 2 sticks of soft butter
2T vanilla extract
3C powdered sugar. Paddle together till smooth. Pipe on top of the cakes, or use as a filling for cakes.
Here is a kid's birthday cake that was made with red velvet
The decor is made with fondant, including the bow, which was made a day prior over a round bottle and left to dry.
When making a cake, it is good to brush the individual cake layers with simple syrup, which is equal parts sugar to water ratio and boiled till all the sugar has been dissolved.
Subscribe to:
Comments (Atom)


